Barn Door Plans
Most of us are short on time and money but still want to make our homes look great. Installing barn doors is a great way to save space in your home while also making it look amazing. However, buying the door can be expensive, which may put you off because you don’t have that extra cash lying around. But there’s no need for this. The following DIY project will show you how you can make your own DIY barn door with free plans.
With these free printable barn door plans, anyone can create their very own custom-made door. It doesn’t matter if you’re handy with tools or not. All that’s needed is basic woodwork knowledge and access to a few household items like paintbrushes and screwdrivers. This step-by-step guide will walk you through every step of creating this beautiful entryway piece so even beginners can get started right away.
DIY sliding door hardware is also available in the market, but if you’re looking for an antique touch, say barn doors, there’s no better solution than making your own. Here are some of the free printable plans available online that you can follow to build this rustic masterpiece
Here are all the Materials You’ll Need
Barn door hardware kitBrush or rollerDark stainLight gold stainPolyurethaneTape measureWood fillerWood gluePine boards
Instructions
Know Your Options for Barn Door Hardware
Before you start shopping for barn door hardware, it’s important to know your options. Keep in mind that you can’t use sliding glass door hardware for making barn doors. The weight of the panels, together with the movement and pressure involved, means that these two types of hardware are not built to support each other.
Also, consider where you would like to build a barn door and figure out how much room you have to work with. For example, if you’re making a barn door for the bathroom, you have to measure and get the correct dimensions for your bathroom. Choosing the right hardware for your door will also depend on this measurement. Make sure that you get hardware long enough to accommodate your space and design.
Choosing a barn door kit is the easiest and most affordable way to get all your hardware in one package. Kits usually come complete with everything you need for installation and can be easily installed by a DIY-er.
ssemble and Measure the Boards
For you to determine the door width, you have to start by assembling the boards. Make sure that they are placed in a way that you can easily measure them. As its name suggests, it is best to use a barn board for your door construction since these boards are thicker and sturdier than standard plywood sheets.
Your DIY sliding door should extend at least one inch past the width of your door opening that doesn’t have trim or an inch beyond the sides of your door opening. If you plan to build a custom-sized barn door that doesn’t match any existing gaps, then you will have to measure and cut your components on your own.
Get the Right Spacers and Floor Guides
Get the spacers that will hold your door in place and won’t harm your flooring. The size of the gap between your door edges to the guides will determine how thick you should make your spacers. Once you have determined the width of your spacer, then cut it out from an appropriately sized piece of wood.
Install Roller Guide
You’ll need a roller guide to avoid ending up with a swing door. The guide will prevent the bottom of your door from dragging along the ground. Depending on how much weight your door will support, you can install this roller using a few screws or nails. The roller must be installed at least 2 inches above the floor; otherwise, it won’t work. One way of ensuring that the roller guide is always in place is to screw it into studs behind the wall.
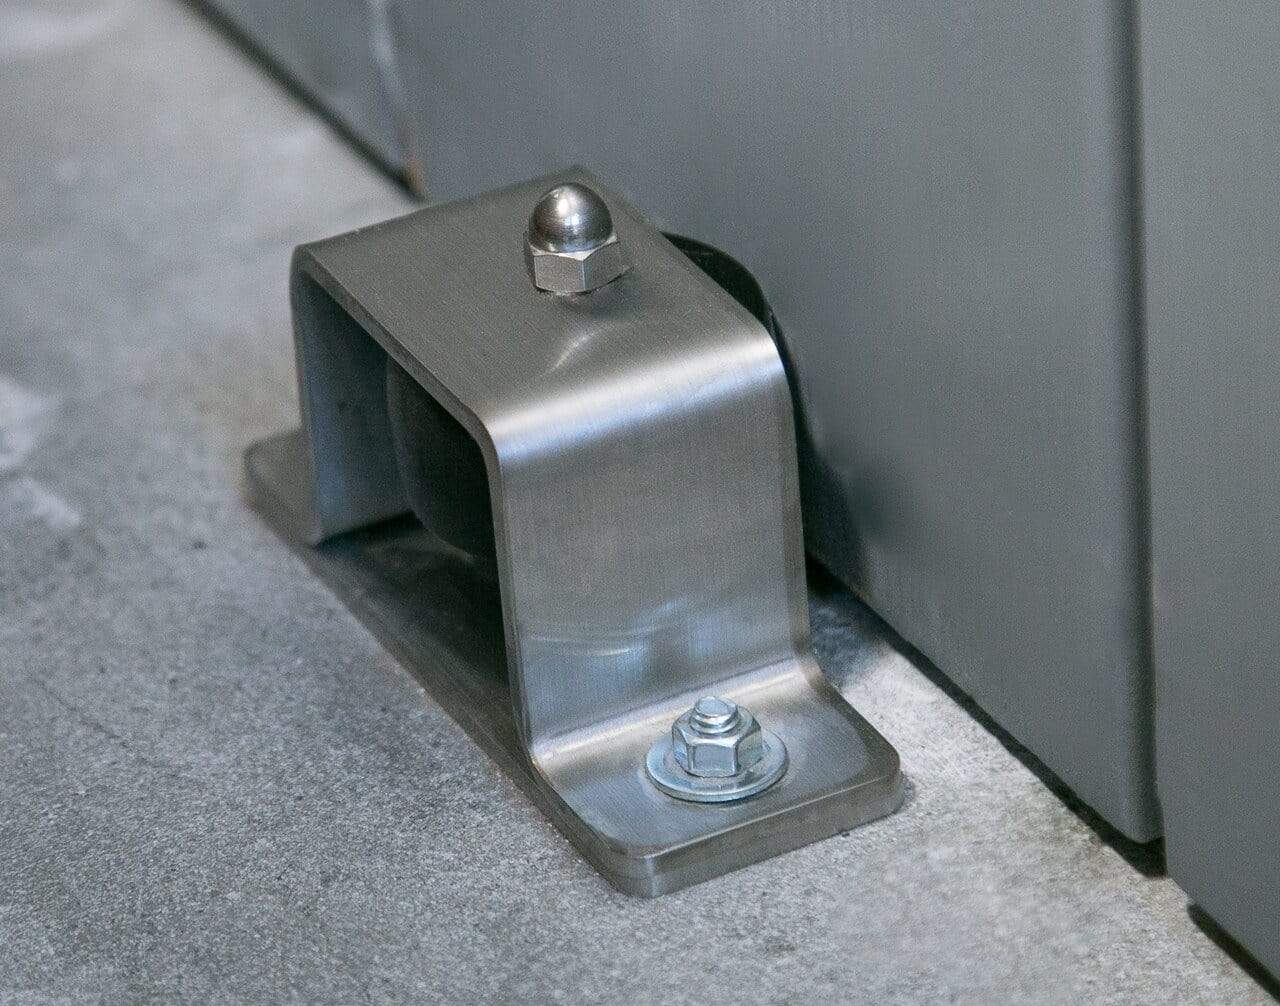
Image caption: https://cdn.shopify.com/
Make Shiplap Boards
When choosing boards, don’t worry about knots, scratches, and gouges; instead, pick straight boards and not the carped or warped ones. Determine the number of boards you’ll need by measuring the area you need to cover and multiplying that by 3½. For example, if you have a 10’x10’ area, then you’ll need 35 boards.
Once you get all your wood home, lay them out in 4 stacks of 9 pieces each for a total of 36 boards. Using a framing square or speed square, draw a line across the boards at 6¾” from each end of every board. This will give you two boards side-by-side with a 3½” space in the middle of them, which makes up one half of your board.
Distress Your Boards with Grinder
Use a brush knot cup mounted on a pole for this. Dip the bristles into the drywall compound, then scrub it onto your boards in short bursts. The dry compound will flake off like an eraser, highlighting the wood’s natural grain and giving it an antique look.
The grinder will also abrade your softwood and expose the grain, giving your wood a weathered look. Start by nailing the board to the sawhorses, then use your grinder to remove wood from the back of it. Make sure you tip the grinder so that the wheel is on the edge and parallel to the board. The nail holes will add that rustic appearance to your door.
If you tip it too much, the grinder will cut into the boards and ruin them. This is not a problem when using softwood, but it’s best to err on the side of caution with hardwood. Keep your grinder moving back and forth in an effortless motion so that you don’t burn out the motor when you’ve finished with the grinder; sand down your board and add a coat of stain to add some color.
pply Base Coat of Stain and then Add Dark Stain
Start by applying a base coat of light gold stains, then add some dark gold stains. This will help to give your door an eclectic look that is both elegant and bold, like the wine it adorns. Use a rag to wipe down any excess stain. Use the rag to dab the stain on, taking care to brush the wood with your strokes rather than dragging the cotton rag around. This will help to avoid streaking. Wipe until you are satisfied with the result and allow it time to dry completely.
Finish with Gray Stain
Apply a thin topcoat of gray stain to the barn door. Here, the gray stain is used in lieu of white paint to let the beauty of the wood show through. Gray has become a popular color for doors and cabinets because it adds a modern touch without being too bold or ornate for a kitchen or bedroom that calls for lightness and freshness. Remember also to finish the ends and the edges of the barn door.
Square the Vertical Slats
Arrange the vertical boards on the door on your work table, spacing them out evenly and leaving a small gap between each board. Measure the distance from one end of the top board to another. Mark that measurement on the bottom board and use it as a measuring stick to ensure all boards are spaced equally apart.
Fasten the Rails
Mark the height of the rails and make sure you attach them with the appropriate distance apart. Use a level to make sure the rails are even when they are attached. Drill pilot holes for the nails and attach the rails to the boards.
Mark the Hanger Holes
Follow detailed instructions included in your door DIY door hardware to determine where to attach the hanger bolts—place pencil marks on the top board at those spots. Make sure you have appropriately sized hardware for your door before you begin this part of the process. Drill pilot holes in the top board and hammer hanger bolts through them, attaching to the bottom board.
Install the Track
Measure 3/4 inch above the door casing and mark where you want to place the track. Screw the track into place, using a drill/driver and screws included in your door hardware. The step you take to mount the track also depends on the design of the hardware you use.
Install Your DIY Sliding Barn Door
You are now ready to hang your barn door. Lift it into place on top of the track. There should be a metal bracket on either side of the door that fits on top of the track. Once you have it in place, hook all four brackets onto each end piece of the track. Now, screw on a hook and eye at the top of the door to hold it shut when it’s closed. Then, install a catch at the bottom, near one of your wall studs, to keep the door from swinging out into the room when you open it.
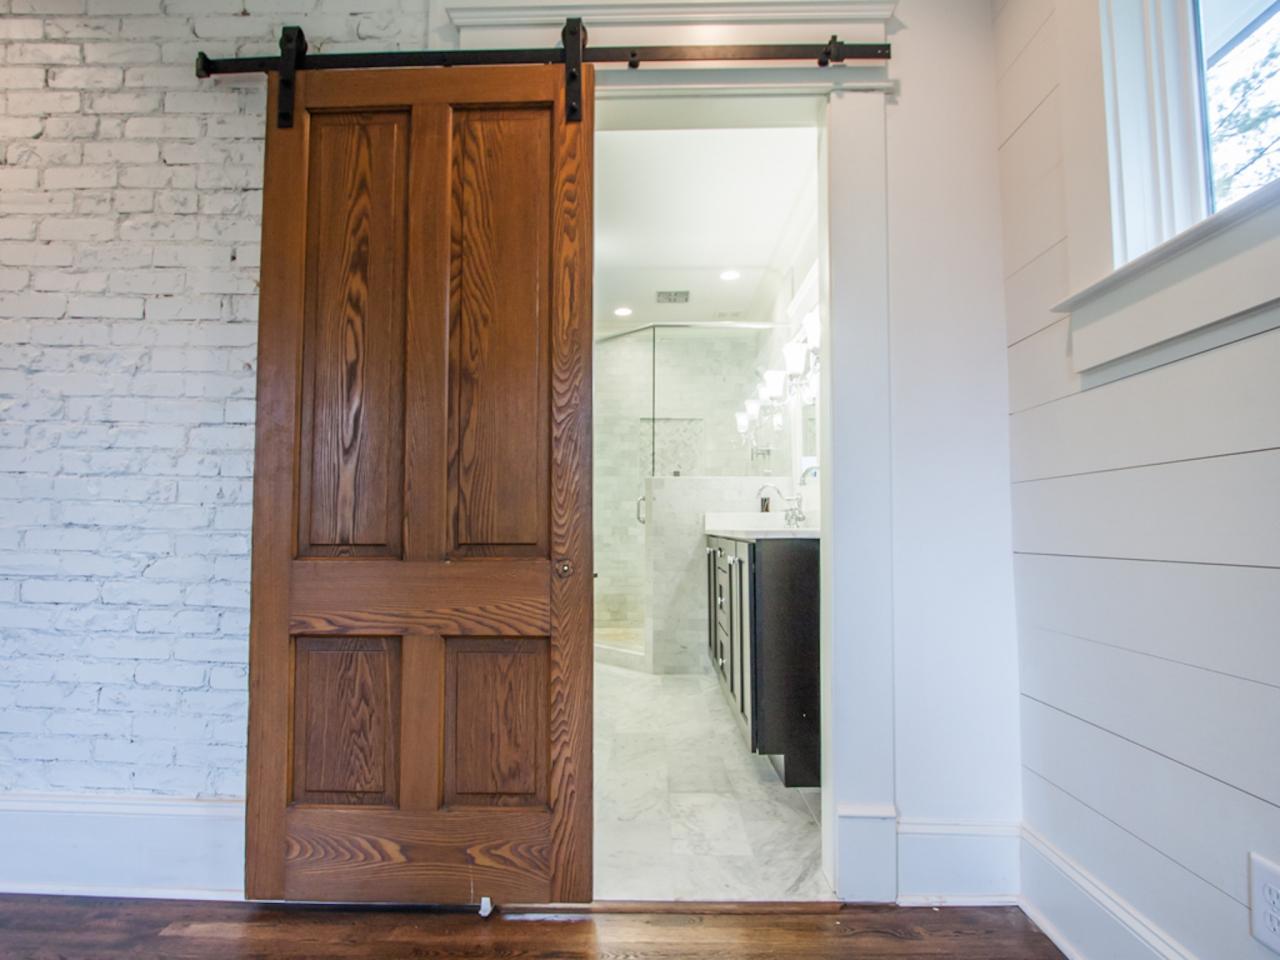
Image caption: https://diy.sndimg.com/
DIY Barn Door Ideas
There are different types of barn doors you can create for your home. They include a traditional rustic look, fresh and simple white doors. Here are the barn door ideas that are available:
Modern Barn Doors for Contemporary House
Install this DIY barn door project with a contemporary design to create a modern look in your house. However, what’s common in this type of door is they’re normally made from aluminum. It means that it won’t cost too much budget for you to buy and install such doors at home.
Wide DIY Rustic Barn Door
If you’re looking for more privacy at home, then this DIY sliding barn door should be your best bet. Its extra-large feature makes it cover a wider space at home.
Dutch Barn Door
Make your door unique with a dutch door: the top and the bottom of this door open separately. You can also open the sections as one door. Its unique feature and attraction make it suitable to incorporate in a pet or baby gate between two rooms.
Closet Sliding Barn Doors with Windows
Add more character to your bedroom by installing this DIY sliding barn door. It’s a great alternative to a tight space that uses mirrored closet doors.So, save space with this DIY sliding barn door.
DIY Barn Door
This sliding barn door hardware adds a nice separation between the kitchen and living area. Installing it is also very easy and requires less capital.
Bi-Fold Barn Doors
Make your own barn door by taking your existing bi-fold and then using decorative slats to look unique. It also adds beauty to the living room.
Colorblocked Barn Door
Make your barn door more modern by adding color to it. This type of door also adds a rustic feel to the living room and dining area.
Sliding Barn Door
You can make a sliding barn door out of almost anything circular or cylindrical for this DIY project. It’s very easy to do, and you will have plenty of extra materials left over from the project.
FAQS on Barn Door Plans
What is the best wood for a barn door?
The most durable woods for barn doors would be oak and pine. Both types of wood are rot-resistant and should last for at least a few years, even in an outdoor environment.
What is barn door hardware?
The hardware that makes the door slide smoothly and also attaches to the other parts. These pieces will determine whether or not your project can be installed as expected.
Final Thought on Barn Door Plans
As you can see, DIY barn doors are very popular. They are easy to complete, and they do not cost much in terms of materials or tools. You can easily find cheap barn door hardware, or you can always make your own if you have the correct plans. The final result is doors that are beautiful, strong, and functional at the same time. These DIY barn doors are perfect for any home improvement and you don’t have to rip off or reframe your wall to install this pocket door.
The post Barn Door Plans appeared first on Kitchen Infinity.
Did you miss our previous article…
https://www.ilovethelovekitchen.com/?p=290